使用acme.sh自动申请Let's Encrypt泛域名证书
#编程技术 2023-11-22 15:19:00 | 全文 3778 字,阅读约需 8 分钟 | 加载中... 次浏览👋 相关阅读
- centos离线(内网环境无外网)安装docker
- 局域内网的服务器利用个人电脑做跳板机访问互联网
- Linux下防御/减轻DDOS攻击工具DDoS deflate安装配置教程
- 如何定位Mysql中CPU占用高的查询语句
- Linux系统VI方向键、删除键按出来是字母解决方法
使用acme.sh自动申请Let’s Encrypt泛域名证书 Let’s Encrypt 是一个非常不错的域名证书机构,致力于普及 https,现在早已能够签发泛域名证书(俗称“野卡”),而且还是免费的,要知道其它机构的泛域名证书可贵的很。
下面就简单介绍一下如何申请 Let’s Encrypt 证书。
也可以参考官方说明:https://github.com/Neilpang/acme.sh。
一、安装 acme.sh:
在 Linux 下在线安装脚本,使用以下命令
curl https://get.acme.sh | sh -s email=my@example.com
或者:
wget -O - https://get.acme.sh | sh -s email=my@example.com
或者 git 安装:
git clone --depth 1 https://github.com/acmesh-official/acme.sh.git
cd acme.sh
./acme.sh --install -m my@example.com
在这一步安装过程中,完成了 3 个任务:
1、拷贝 sh 脚本到 ~/.acme.sh/
2、创建 alias 别名 acme.sh=~/.acme.sh/acme.sh
如果没有自动创建别名(执行 acme.sh,提示 command not found),可以使用以下命令自行创建:
alias acme.sh='/root/.acme.sh/acme.sh'
3、启动定时器,并加入到定时任务
其中定时任务可以通过 “crontab -l” 命令查看到,若没有,也可以自行添加,定时任务如下:
0 0 * * * "/root/.acme.sh"/acme.sh --cron --home "/root/.acme.sh" > /dev/null
如果不想使用默认安装,可以使用高级方式安装,在此安装方式下,可以指定安装目录等相关内容,具有一定灵活性,具体如下:
git clone --depth 1 https://github.com/acmesh-official/acme.sh.git
cd acme.sh
./acme.sh --install \
--home ~/myacme \
--config-home ~/myacme/data \
--cert-home ~/mycerts \
--accountemail "my@example.com" \
--accountkey ~/myaccount.key \
--accountconf ~/myaccount.conf \
--useragent "this is my client."
参数说明:
–home:指定 acme.sh 安装的目录,默认是安装到 ~/.acme.sh。
–config-home:指定一个可写的文件夹,acme.sh 将在其中写入所有文件(包括 cert / keys,configs)。 默认情况下,它位于 –home。
–cert-home:指定一个目录,用于保存颁发的证书。 默认情况下,它保存在 –config-home。
–accountemail:指定一个用于注册 Let’s Encrypt 帐户的电子邮箱,通过此电子邮件将收到续订等通知。
–accountkey:指定一个保存您帐户私钥的文件。 默认情况下,这个文件保存在 –config-home。
–accountconf:指定一个帐户配置文件。 默认情况下,这个文件保存在 –config-home。
–user-agent:发送给 Let’s Encrypt 的 user-agent 请求信息。
从上面可以看出很多默认选项,比如 –config-home 的路径默认选项是 –home,–cert-home 的默认路径是 –config-home,所以可以充分使用默认选项,这样可以更简单一点。
举个例子,我要将 acme.sh 安装到 /data/myacme 目录,并将签发的证书保存到 /data/SSL 目录,使用如下命令即可:
git clone https://github.com/acmesh-official/acme.sh.git
cd acme.sh
./acme.sh --install \
--home /usr/local/acme.sh \
--cert-home /data/SSL
注意:现在 Let’s Encrypt 自 V3 以后,开始使用 ZeroSSL 的 CA 证书,在申请域名证书之前需要先注册(详见:https://github.com/acmesh-official/acme.sh/wiki/ZeroSSL.com-CA ),请使用如下 命令:
acme.sh --register-account -m my@example.com
在未注册时申请域名证书,也会有相应的提示,按提示的命令注册即可。
二、http/tls 方式申请域名证书:
安装好 acme.sh 之后,就可以使用 acme.sh 的 http 方式或 TLS 方式申请单域名或多域名证书(一个根域名或多个二级域名)。注意:此方式不支持申请泛域名证书。
1、webroot 模式申请证书:
如果你已经在服务器上建立了网站,acme.sh 也安装到了此服务器,此时若需要为此网站的域名来申请证书,可以通过 webroot 的方式来验证申请,命令如下:
acme.sh --issue -d example.com -d www.example.com -w /home/wwwroot/example.com
其中 “/home/wwwroot/example.com” 是你网站根目录,要确保能正常访问。www.example.com 和 example.com 为需要申请证书的域名。申请完成后,域名证书存放在 “~/.acme.sh/example.com/” 中。
注意:此申请方式在申请过程中,必需要指定域名,也必需并指定域名所在的网站根目录,acme.sh 在执行过程中会在网站根目录生成一个隐藏文件夹 “.well-known”,并在里面全自动的生成验证文件, 然后自动完成验证, 最后会也会自动的删除验证文件, 整个过程没有任何副作用。
2、独立模式申请证书:
如果服务器上没有启用 Web 服务,仅安装了 acme.sh,则可以使用独立模式申请域名证书,此时需要将你要申请证书的域名做 A 记录到这台服务器的 IP,并且要安装 socat,acme.sh 会模拟 web 验证方式来签发证书。
使用 80 端口签发证书:
acme.sh --issue -d example.com -d www.example.com --standalone
如果服务器上没有开放 80 端口,但开放了其它端口,如 8080,则可以使用 –httpport 指定端口:
acme.sh --issue -d example.com -d www.example.com --standalone --httpport 8080
3、tls 独立模式申请证书:
此种方式也需要将你要申请证书的域名做 A 记录到这台服务器的 IP,并且要安装 socat。
如果服务器上仅开放了 443 端口,也可以使用独立的 tls 模式来申请证书:
acme.sh --issue -d example.com -d www.example.com --alpn
如果 tls 使用的是非标准 443 端口,则可以使用 –tlsport 指定 tls 端口:
acme.sh --issue -d example.com -d www.example.com --alpn --tlsport 8443
三、利用 nginx/apache 申请域名证书:
如果服务器上安装了 nginx 或是 apache,可以直接使用 –nginx 或 –apache 参数来签发证书,acme.sh 会自动生成一个 nginx/apache 配置文件,用以验证指向这台服务器的域名并签发证书:
acme.sh --issue -d example.com --nginx
acme.sh --issue -d example.com --apache
四、DNS API 方式申请域名/泛域名证书:
1、导入 DNS API:
签发泛域名证书是最好的方式了,申请一个证书任意二级域名都可以使用,非常方便。
根据你的域名服务商提供的 DNS API,并导入 DNS API,各域名服务商的 DNS API 请参考官方说明:https://github.com/Neilpang/acme.sh/tree/master/dnsapi
这里以 Cloudflare 为例,
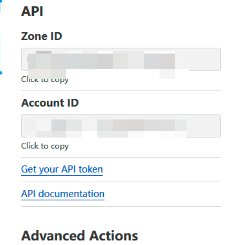
打开 Cloudflare设置页面:https://dash.cloudflare.com/profile
- 登录
- 选择账户详情
- 选择API Token
- 选择创建令牌
- 选择区域 DNS 模板,并设置编辑写入权限
- 生成并复制令牌备用
配置 Acme.sh
导入环境变量
export CF_Token="获取到的令牌"
export CF_Email="你自己的CloudFlare账户登录邮箱"
2、申请泛域名证书:
开始调用 cloudflare API 自动添加 DNS Record,自动解析 DNS(通过 api 给你的域名添加一条 txt 解析记录),验证通过后就会下发证书:
./acme.sh --issue --dns dns_cf -d example.com -d *.example.com
开始安装令牌到指定目录
acme.sh --install-cert -d "*.example.com" --key-file /root/private.key --fullchain-file /root/cert.crt --ecc
运行此命令后,证书 crt 路径为/root/cert.crt,私钥key路径为/root/private.key,可自行修改
上述步骤会做成crontab定时任务的形式,当ssl证书过期后会自动运行重新申请
crontab -l // 查看定时任务
证书申请成功后,默认保存在 “~/.acme.sh/example.com” 目录下。
五、DNS 手动申请域名/泛域名证书:
这种方式不需要导入 DNS API,但需要你登录到域名商网站,手动增加 DNS 和 txt 记录以便完成验证。手动模式不支持自动续签,每次需要手动验证申请,不建议使用。
运行如下命令,请求签发证书,会提示你做一条 txt 记录,按提示做好 txt 记录:
acme.sh --issue -d example.com -d *.example.com --dns \
--yes-I-know-dns-manual-mode-enough-go-ahead-please
做好 txt 记录生效后,运行如下命令,即可签发证书了(注意:第一次是 –issue,第二次是 –renew):
acme.sh --renew -d example.com -d *.example.com \
--yes-I-know-dns-manual-mode-enough-go-ahead-please
六、拷贝证书到 nginx 或 apache 目录:
默认生成的证书都放在安装目录下, 不建议直接通过 nginx 或 apache 使用此目录下的证书。正确的使用方法是使用 –install-cert 命令,并指定目标位置,,然后证书文件会被 copy 到相应的位置,例如:
Apache 命令如下:
acme.sh --install-cert -d example.com \
--cert-file /path/to/certfile/in/apache/cert.pem \
--key-file /path/to/keyfile/in/apache/key.pem \
--fullchain-file /path/to/fullchain/certfile/apache/fullchain.pem \
--reloadcmd "service apache2 reload"
Nginx命令如下:
acme.sh --install-cert -d example.com \
--key-file /path/to/keyfile/in/nginx/key.pem \
--fullchain-file /path/to/fullchain/nginx/cert.pem \
--reloadcmd "service nginx reload"
执行该命令后,命令中的参数将自动保存在 ~/.acme.sh/example.com 目录下的 example.com.conf 文件里,定时器更新证书的时候实现自动部署。
上述命令把下发的证书复制到你指定的位置,这样避免你直接从 “~/.acme.sh/” 读取证书,然后重新加载 nginx 或 apache 以刷新证书。域名为必需参数,其它参数为可选。
但要注意的是,reloadcmd 参数非常重要(reloadcmd 后面的参数为重新加载 nginx 或 Apache 的命令,可以根据系统的不同作相应修改),即使更新了证书,但是 nginx 或 apache 没有重新加载,证书是不是会刷新到服务中去的。
七、升级更新 acme.sh:
升级 acme.sh 可以使用以下命令:
acme.sh --upgrade
或者使用自动升级,使用以下命令,有更新就自动更新,不需人工干预:
acme.sh --upgrade --auto-upgrade
要关闭自动升级使用以下命令:
acme.sh --upgrade --auto-upgrade 0
八、acme.sh 的基本管理:
1、查看 acme.sh 已签发证书的域名:
acme.sh --list
2、从 acme.sh 中移除不需要再次签发证书的域名:
acme.sh --remove -d example.com
3、删除 acme.sh:
acme.sh --uninstall
VIA:
使用Let’s Encrypt的acme.sh申请泛域名证书 - Program Say:https://www.psay.cn/toss/126.html
acmesh-official项目地址:https://github.com/acmesh-official/acme.sh/tree/master
How to install/如何安装:https://github.com/acmesh-official/acme.sh/wiki/How-to-install
DNS manual mode/DNS手动签发:https://github.com/acmesh-official/acme.sh/wiki/DNS-manual-mode
How to issue a cert/如何签发证书:https://github.com/acmesh-official/acme.sh/wiki/How-to-issue-a-cert
How to use DNS API/如何使用DNS API:https://github.com/acmesh-official/acme.sh/wiki/dnsapi